
🛡️ How-To Guide: The Assurance Section
This section is your central command center for managing Governance, Risk, and Compliance (GRC). It’s designed to help you proactively identify issues, manage incidents that occur, and assess long-term organizational risks.
1. How to Access the Assurance Sub-sections
Unlike the other modules, "Assurance" is a category that contains three separate sub-sections.
- Step 1: On the left-hand navigation bar, click on the "Assurance" link. It has an icon of an exclamation mark in a diamond.
- Step 2: When you click it, a sub-menu will expand, showing three new options:
- Hazards
- Incidents
- Risks
Here is the guide for each of those three sections.
1A. Hazards

This sub-section is for proactive risk management. You use it to log and track potential hazards before they can cause an incident or injury.
- What it's for: Recording and managing potential issues, like "a wet floor," "a frayed electrical-cord," or "an unlocked medicine cabinet."
- Inferred Step-by-Step Guide:
- Navigate to Assurance > Hazards to see a list (or "register") of all known hazards.
- Look for a button labeled "+ Log Hazard" or "Add New Hazard".
- Click it to open a new form.
- Fill in the details, which will likely include:
- Hazard Description: What is the potential problem?
- Location: Link it to a Specific Facility (e.g., "Facility 01").
- Risk Level: Assign a severity (e.g., Low, Medium, High).
- Date Spotted: When was this hazard identified?
- Status: Set the current status (e.g., "Reported," "Under Review," "Resolved").
- As the hazard is fixed (e.g., the frayed cord is replaced), you would return to this entry, document the corrective actions, and change the status to "Resolved."
1B. Incidents
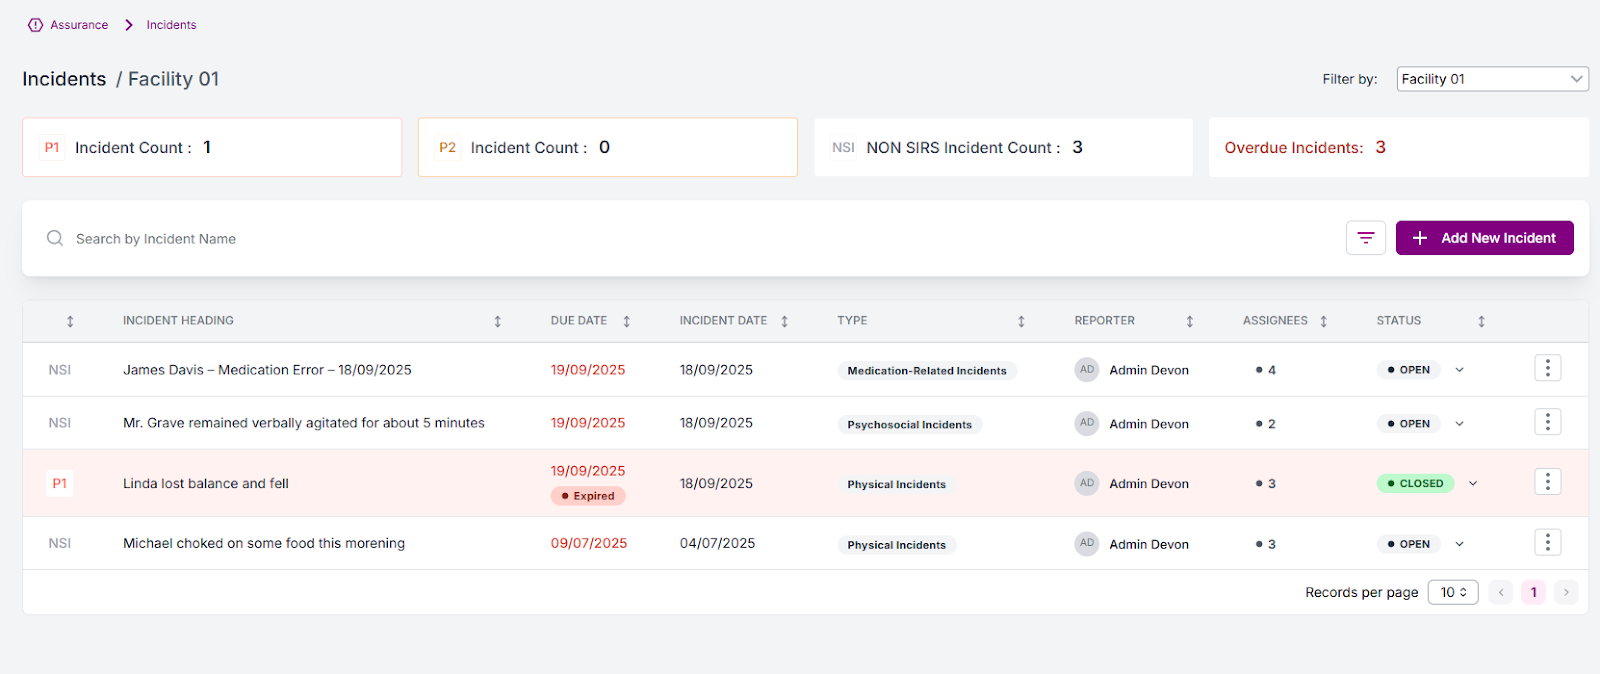
This sub-section is for reactive management. You use it to create official reports for events that have already happened.
- What it's for: Logging and tracking all incidents, such as "a resident fall," "a medication error," "a data breach," or "a formal complaint".
- Inferred Step-by-Step Guide:
- Navigate to Assurance > Incidents to see a dashboard or list of all reported incidents.
- Look for a button labeled "+ Report Incident" or "Log New Incident".
- Click it to open a detailed incident report form.
- Fill in the form with all required information, such as:
- Incident Type: Select from a list (e.g., "Fall," "Complaint," "Medication Error").
- Date and Time: When did the incident occur?
- Facility: Where did it happen?
- Individuals Involved: Link to any residents or staff involved.
- Incident Description: A detailed, factual account of what happened.
- Immediate Actions Taken: What was done right away to ensure safety?
- After submitting, the incident is logged with a status like "Open" or "Under Investigation." You will use this section to track all follow-up actions, investigations, and the final resolution, creating a complete record for auditing and review.
1C. Risks
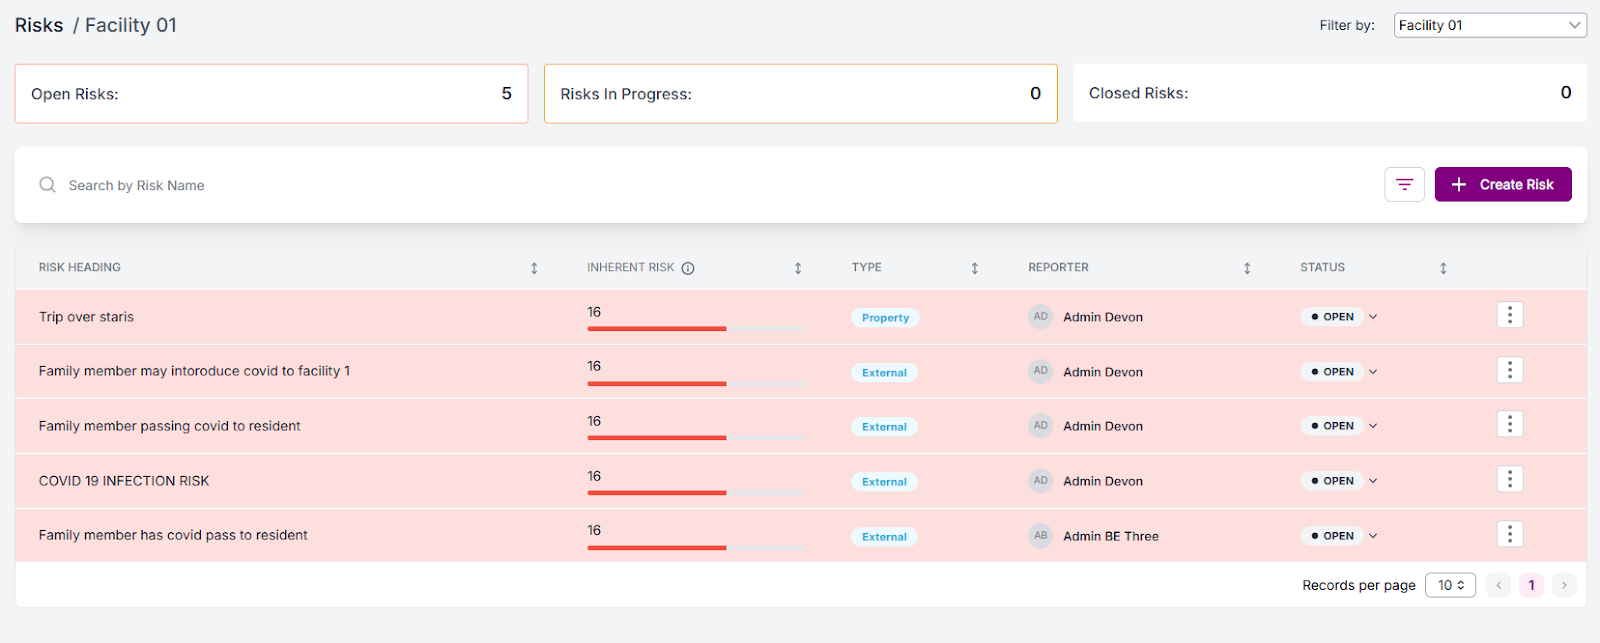
This sub-section is for strategic risk management. This isn't for a single wet floor (that's a hazard) or a single fall (that's an incident), but for high-level organizational risks.
- What it's for: Maintaining your formal "Risk Register." This is where you identify, evaluate, and mitigate broad risks to the organization, such as "Staffing Shortages," "Regulatory Changes," "Cybersecurity Threats," or "Financial Risks".
- Inferred Step-by-Step Guide:
- Navigate to Assurance > Risks to view your organization's risk register.
- Look for a button labeled "+ Add Risk" or "Create New Risk".
- Click it to open a form for defining the risk.
- Fill in the details, which will likely include:
- Risk Title: A clear name for the risk (e.g., "Risk of Non-Compliance with New Regulations").
- Risk Category: (e.g., "Operational," "Financial," "Compliance").
- Risk Assessment: You will likely assign scores for Likelihood (how likely is this to happen?) and Impact (how bad will it be if it does?).
- Control Measures: What is the organization currently doing to prevent or reduce this risk? (e.g., "Quarterly training," "Firewall in place").
- Risk Owner: Assign a person responsible for monitoring this risk.
- This register is a "living document" that you will review regularly (e.g., quarterly) to update risk scores and ensure your controls are effective.